Showing posts with label DIY One Direction Craft. Show all posts

Monday, August 6, 2012

I pledge allegiance to the band . . .


There is no better way of representing our four brits and leprechaun then this bad boy ... 
Yes, my mom first saw this picture and thought the ink in our printer had distorted the image. No, not everyone will understand it. But hey, this is what waves in our world. Why not show it off with this super cute, super easy DIY bottle cap necklace ?

The easiest way to accomplish this would be to run off to your local scrap-booking store. They should have all the necessities.

You'll need:

- Bottle caps
- Jump ring
- Photo of choice, printed out
- Diamond glaze
- Chain
- Pencil
- Scissors

1. First print out your photo. Make it small enough, so when you cut out a circle your entire design will fit.
2. Once its printed, do your best at tracing the bottle cap (around a 1" circle). This is where the scrap-booking store could help you first, ours had a 1" hole punch they let us use.


3. Next you'll need a small hole punched into the lip of the cap. Once again, scrap-booking store came to the rescue with the perfect tool. 
4. Open up the jump ring, slip it though the hole, and close it. 
5. Now its time to put everything together. Squeeze a thin layer of the diamond glaze into the bottom of the bottle cap. Gently press the photo into it and smooth out any air bubbles. 
6. Now slowly squeeze a thick layer of the glaze onto the top. Once you've filled it almost to the top, let it dry overnight. 
7. The next morning string the jump ring onto the chain and wear it proudly. 


Monday, July 23, 2012

Pop a Cork for the 2 Year Anniversary


     This couldn't be a more momentous day, and I am proud to wish 1D a very happy second birthday.
     On that note, today I created a decorated cork board by repurposing an old and broken cork trivet I literally had to pull out of the garbage.  ( completely clean I may add, I'm not that weird )


Yourrr supplies:

Fabric (red, white, and blue)
Fabric scissors
Anything cork (:
Mod podge
Paint brushes
Supplies for super duper push pins:

Push pins
Brush on gloss
Paint brushes
Small paper cups
Ultra fine glitter

     1. The reason my family had to retire our cork circle was because it completely cracked in half. And as the saying goes, one mans trash is another mans treasure. I liked the half circle look, so I just took a serrated knife and evened out the bottom.


     2. Next take your blue fabric, and cut out whatever shape your cork is making it slightly larger.


     3. Cover the front of the cork with a nice layer of mod podge with your brush and place onto the fabric. I suggest letting it then dry completely. It will make the next step a lot less messy.


     4. Once the front is dry, take your fabric scissors and make little snips along the edge. ( I lack of a better way of describing them.. I suggest checking out the pic )


     5. Cover the sides of the cork and the little fabric flags in mod podge and fold them up one at a time. Again, let them dry completely.


     6. While your waiting for it to dry, start with your white fabric and cut out the four strips needed to make the flag.  Do the same thing with the red. Make sure you lay them all out together, checking the length and width and making sure it all looks right.


     7. Grab the mod podge again, and brush some onto the front of your cork (on top of the blue fabric) where the white is going to go. Stick down the fabric and repeat with your red fabric.


     8. Let dry. ( you could help it out a little with the hair dryer, on cool)
     9. While I was waiting I took out some of my push pins to "sparkle". In the paper cup, mix together a small amount of the gloss and glitter. Stir with a paint brush.


     10. Find something to stick the pins in so they stand up, I used our bathroom tissue box (but lets not tell my mom that one)


     11. Using the glitter gloss brush on a nice layer. let it dry.


     12. This step is optional. You can (a) leave your board as is (b) layer on one coat of the plain gloss (c) be a little crazy like me and add some of the glitter gloss. i used clear glitter, just on the red. i couldn't resist! i am now in the mood to glitter everything! 


     13. Once everything dries, you're done !


TADA ! Im thinking of making one with magnets on the back .. thoughts ? 
***** As always we encourage you to contact us with your thoughts of our crafts. send us comments, pictures, questions, compliments, complaints, suggestions, riddles, knock-knock jokes. ANYTHING. 

Contact us through  ...
twitter: @NiallnPotatoes
facebook: http://www.facebook.com/niallandthepotatoes53
lots of love 


Monday, June 25, 2012

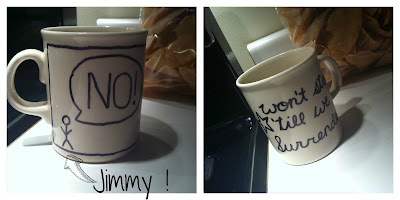
Having A Cupppppa With 1D

Now, if your like me, you need to sit down and have a cup of coffee before you do A N Y T H I N G in the morning.  So, why not start the day off right with One Direction?!


Shtufff ya need:

- Plain white mugs
- Sharpie
- Oven 
- Cookie Sheet

Directions:

1) Draw whatever you want onto the mug with sharpie.  Obviously, we went with a One Direction theme. Duh(; You can use plain black or different colors, as long as it's a permanent marker.

2) Put the mug(s) onto a baking sheet and bake at 350 degrees fahrenheit for 30 minutes.

3) Let cool completely.


Tips:

1) We drew the design on first with pencil, and then went over it with sharpie.

2) If you mess up when your drawing with sharpie, use some nail polish remover with a q-tip.


NOW FOR THE FINISHED PRODUCTS!(:

The Daddy Direction Mug:

The AmaZayn Mug:

Mug O' Niall:

&& Last buuut not least,

The Larry Stylinson Mug:


Have a GREEEEAT day<3


Monday, June 18, 2012

... Happy Birthday, because it means I get presents.

     Every directioner has one thing in common.. besides the obsessing, stalking, and loving of a certain five european boys. There is one more similarity --- > we all have birthdays! While the ideal gift would be front row concert tickets, I have the next best thing for you. 


      Ladies and gents let me introduce you to probably the most fun gift to put together, and to receive! Ashley and I made this last month and couldn't wait to share. <3 This was just too much fun.


     The Supplies Needed: 


  • A large cardboard box
  • Water balloons
  • Picture and quotes printed small
  • Time!

     1. Start by collecting everything. Remember to start early! This takes time, but is super worth it. Some planning is definitely neccessary. Think about how many balloons you want to make, how many pictures you want to add, how crazy you want to go!
     
       2. For our gift, we went big. At the end, we ended up having 114 small balloons filled up, each probably containing between 3-5 photos in it.. you do the math (;


      3. First you need to print out your pictures. The subject matter is up to you! We had a ton of One Direction, some Taylor Swift quotes, the hysterical Sue Sylvester from Glee and her best lines, Hunger Games funnies, and more One Direction. The easiest way to complete this is to copy/paste them into a word document, resize them all to around 1-2in, print and cut out.


      4. Next is to find anything else you want to include, for example:
         -we each chipped in some five dollar bills to give
         -two friendship bracelets were made for the birthday girl 
         -handwritten quotes were made


      5. Now for the fun part! Everyone probably could find their own method to stuffing the balloons, but I'll share how i did it. Make sure to fold the pictures long and skinny. Stretch out the balloon a bit and insert the pictures, carefully! You can get more into one balloon depending on how you fold them, and with practice. Once the papers are in the balloon, stretch the mouth of it up, so you can blow up the ballon.


      6. Once you have all of your balloons filled, blown up, and tied, you are ready to complete the gift. After packing them into a suitable box we made this card, including a safety pin to give her an idea of what she needed to do (:     


      7. Lastly we taped everything closed, decorated the box a bit to cover up the unsightly labels and tears, AND VIOLA! You're ready to wrap.


      The reaction after giving this gift is priceless. We had such a blast watching her pop open all of these little surprises... and an hour later we were left with this:


What a great day!  


Monday, May 28, 2012

Lets take a walk, in One Direction.

FIRST POST<3333heyyy folks. Are you ready for this?


There are two kinds of people in this world, those who wear converse, and those who don't.
Now, if your like me, you fall into the "do" category. You'll know that its not possible to have just one pair. Every new color, style, and pattern catches your eye and soon your trusty plain old black pair gets shoved to the back of your closet, never to be seen again.


Being a crafter, i saw so many possibilities for these old shoes. Being a directioner, I had just the plan. 


What we'll need: 

-old pair of shoes
-fabric paints
-inspiration(:

1. Take out the laces, and put them aside.

2. Once you have an idea, just go with it! Use your paints to draw, outline, write, and "fancy up" those old chucks.

3. Let them dry, over night would be your best bet.

4. The next day, lace up your shoes however you like.


<<<< how cool are these? add a little more fun to your shoes (:

ENJOY<3