Monday, June 25, 2012

Having A Cupppppa With 1D

Now, if your like me, you need to sit down and have a cup of coffee before you do A N Y T H I N G in the morning.  So, why not start the day off right with One Direction?!


Shtufff ya need:

- Plain white mugs
- Sharpie
- Oven 
- Cookie Sheet

Directions:

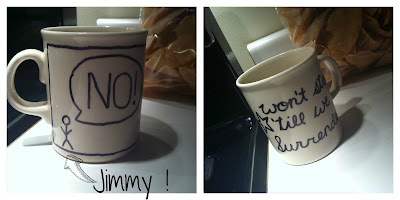
1) Draw whatever you want onto the mug with sharpie.  Obviously, we went with a One Direction theme. Duh(; You can use plain black or different colors, as long as it's a permanent marker.

2) Put the mug(s) onto a baking sheet and bake at 350 degrees fahrenheit for 30 minutes.

3) Let cool completely.


Tips:

1) We drew the design on first with pencil, and then went over it with sharpie.

2) If you mess up when your drawing with sharpie, use some nail polish remover with a q-tip.


NOW FOR THE FINISHED PRODUCTS!(:

The Daddy Direction Mug:

The AmaZayn Mug:

Mug O' Niall:

&& Last buuut not least,

The Larry Stylinson Mug:


Have a GREEEEAT day<3


Monday, June 18, 2012

... Happy Birthday, because it means I get presents.

     Every directioner has one thing in common.. besides the obsessing, stalking, and loving of a certain five european boys. There is one more similarity --- > we all have birthdays! While the ideal gift would be front row concert tickets, I have the next best thing for you. 


      Ladies and gents let me introduce you to probably the most fun gift to put together, and to receive! Ashley and I made this last month and couldn't wait to share. <3 This was just too much fun.


     The Supplies Needed: 


  • A large cardboard box
  • Water balloons
  • Picture and quotes printed small
  • Time!

     1. Start by collecting everything. Remember to start early! This takes time, but is super worth it. Some planning is definitely neccessary. Think about how many balloons you want to make, how many pictures you want to add, how crazy you want to go!
     
       2. For our gift, we went big. At the end, we ended up having 114 small balloons filled up, each probably containing between 3-5 photos in it.. you do the math (;


      3. First you need to print out your pictures. The subject matter is up to you! We had a ton of One Direction, some Taylor Swift quotes, the hysterical Sue Sylvester from Glee and her best lines, Hunger Games funnies, and more One Direction. The easiest way to complete this is to copy/paste them into a word document, resize them all to around 1-2in, print and cut out.


      4. Next is to find anything else you want to include, for example:
         -we each chipped in some five dollar bills to give
         -two friendship bracelets were made for the birthday girl 
         -handwritten quotes were made


      5. Now for the fun part! Everyone probably could find their own method to stuffing the balloons, but I'll share how i did it. Make sure to fold the pictures long and skinny. Stretch out the balloon a bit and insert the pictures, carefully! You can get more into one balloon depending on how you fold them, and with practice. Once the papers are in the balloon, stretch the mouth of it up, so you can blow up the ballon.


      6. Once you have all of your balloons filled, blown up, and tied, you are ready to complete the gift. After packing them into a suitable box we made this card, including a safety pin to give her an idea of what she needed to do (:     


      7. Lastly we taped everything closed, decorated the box a bit to cover up the unsightly labels and tears, AND VIOLA! You're ready to wrap.


      The reaction after giving this gift is priceless. We had such a blast watching her pop open all of these little surprises... and an hour later we were left with this:


What a great day!  


Monday, June 11, 2012

A simple, but effective way to save(;

Now, if your like me, you have a bunch of little things on your dresser and have no where to put them. Or if you try to save your money for something (ex. ONE DIRECTION CONDERT :D ), you end up spending all your money on stuff that you just couldn't pass up. 


Well, what if you had a special little jar where you could put some small little knick knacks or perhaps money? Well, if you have been looking for some extra classy storage or a One-of-a-Kind piggy bank, then this is for you!


INGREDIANTS(;

-black puffy paint
-red paint
-green paint
-white paint
-1 big paint brush
-pencil & pin stuck in the eraser part
- EMPTY Noxema jar (facewash) or a similiar jar


♫♪NOOOW TIME TO GEEET CRAAAAFTY♪♫

1. On the noxema jar, draw a rectangle on a little less than half of the jar with black puffy paint.
2. once that is dry, color in the British flag. ---> copy picture!


3. on the OTHER SIDE of the jar, draw ANOTHER rectangle for the Irish flag. (again with the black puffy paint)

4. color in the Irish flag when that is dry. ---> copy picture!

5. Use the big paint bursh & write "ONE" in between the flags. TIP: squeeze some black puffy paint onto some newspaper and then just dip the paint brush into it. (REMEMBER: the flags should be a little less than half of the jar, so there should be room for the words(: )

6. on the other side, use the end of the pin and dip it into the black puffy paint. write out "DIRECTION".

BOOOOOOM SHAKA LAKA. ONE DIRECTION JAR. THIS JAR IS HARRY STYLES APPROVED(;


You can cut a hole in the lid and use it as a piggy bank to save up for a one direction concert(:


Monday, June 4, 2012

LUCK O' THE IRISH.

Alright guys, this week we're staying simple (: 

"Every band needs an Irish man."


... no, not this one. 


< This boy was my inspiration for today <3 annnnd most every day (;  foooooorr my new ...


GOOD LUCK CHARM !


     Good luck charms are always nice, and I decided to make an extra special one this testing season. This little four leaf clover is my way of having the luck of the irish with me at all times. I made it specifically for a big test, so lets hope it worked some magic!

All it took was some:

- recycled cardboard ( I just used the back of an old notebook)
- a pencil
- scissors
- any type of paints


1. I started out by getting a nice four leaf clover traced onto my piece of cardboard. I went for a size just small enough to fit in my pocket.


 2. Next is just to cut it out, being careful how thin you cut the stem. It can become fragile.


3. Last is to decorate! I did the pattern of the irish flag, incorporate as much Niall as possible <3 I used fabric paint, because it is what I had on hand. It would be totally possible to use any paints... or markers!

I really hope you enjoy your lucky charm. HAPPY MONDAY :D